Aging metal roofs and siding have always been a sore spot with me. I have tried, over the years to achieve the patina look with paint and never could quite get the color right, or at least to my liking. This technique has been around for some time, and I can remember reading Mic Greenberg’s article in the Narrow Gauge Shortline Gazette way back in the 1980s; however, never gave it much thought. Fast forward to now, when I stumbled upon this technique again, courtesy of Marc Reusser.
The idea is rather simple, using ferric chloride of some type, submerge the aluminum roofing material, clean up and weather it.
What is ferric chloride? Iron(III) chloride is also known as ferric chloride, which is commonly used by computer techs for etching PC boards. Modelers are, and have, been using it to patina copper, aluminum and other metals with fantastic results.
Using this material can be hazardous so precautions must be observed when working with it. I always use rubber gloves along with eye and respiratory protection.
Setting Up a Workstation
I like to set up a work station to simplify the process and to keep my table organized. To begin, I have a small glass container to hold my etchant, followed by a container of water with dish soap added. Paper towels will be used to lay all the material on.
Getting Started
There are a couple of items to note before we actually begin; first, this only works on metal. Card stock, styrene and other material will not work. Second, if you are going to be using aluminum foil to create your own roofing material, typically, the store bought brand is extremely thin and the etchant will completely dissolve it in seconds. Be sure you are using thicker or heavy-duty foil.

The material I am using is from Builders in Scale which comes in many scales and styles. It’s thick enough to handle the etchant however, thin enough to look very realistic. Out of the package, it is very shiny as seen above. Cut your pieces to width and lay them in a pile on your work station. You will want to work with them one at a time.
On some of my sheets, I like to add holes and dents to add more character. The etchant can and will attack these holes further adding to the aging process.
Using tweezers, hold each sheet in the etchant for a few moments. You will notice nothing happens at first. Be patient and again, work one at a time. Bubbles will appear and then a violent reaction will take place as the etchant is eating into the material. Remove the sheet and quickly place it into your water solution to neutralize the etching process.

Now, place them on a paper towel to sit. The pieces will look dark grey/black and tarnished which is exactly what we are looking for.
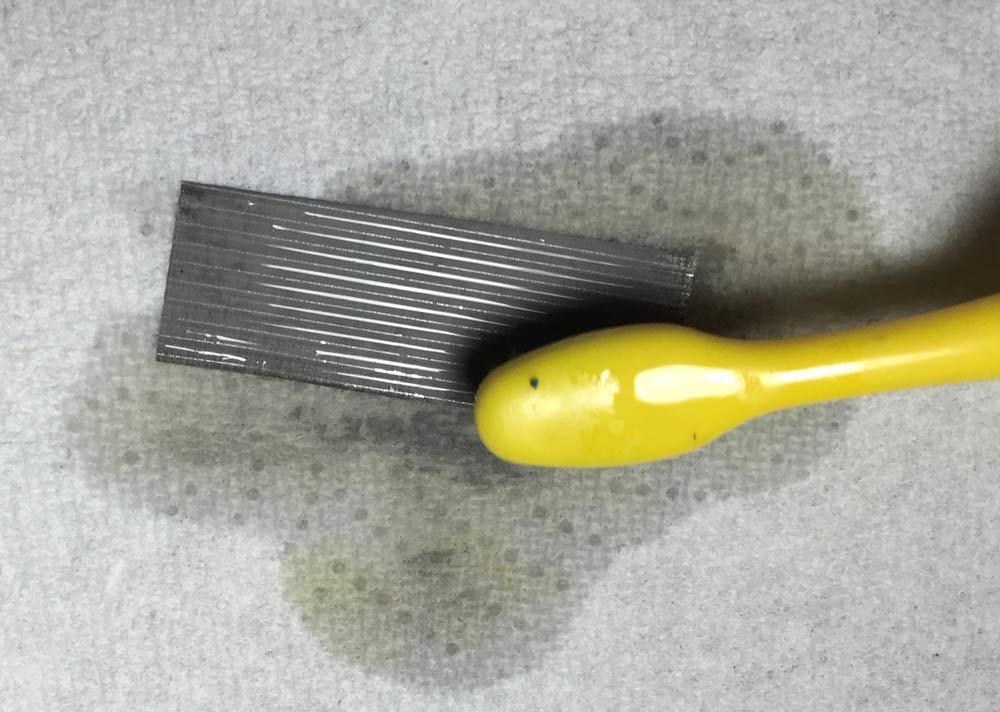
While each piece is still wet, use a toothbrush to remove the top coat of etched material. It will start to take on a lighter grey appearance as you are brushing them. Continue the process by dipping the material into the water and then brushing them, repeating this process a couple of times to stop the etching process and clean the material thoroughly. Allow them to dry on the paper towels. Do this with all your sheets and allow them to dry overnight.
Acrylic Weathering
We will begin by using a makeup sponge as our paintbrush. Depending on the weathering, I may use a more porous sponge, such as those used for painting home interiors. Tear a small piece off the sponge and use tweezers to hold it while you work.

Add color beginning with the darkest first. I like to lightly touch the sponge into the paint and dab the access onto a paper towel until almost dry.
Build your colors in layers using multiple pieces of sponge in order to keep the weathering patterns different.
Once I’m satisfied with my background colors, I will use pigments to add more texture and dimension to the weathering effect. Starting with darker colors first as before, place a small amount of the pigment onto the desired area with a brush or sponge. Dip another brush into your mineral spirits and lightly dab it onto the pigments, allowing it to flow into the material. Make sure the spirits are running with the flow of rainwater.
You can further the weathering effect by dusting on a thin layer of dirt. This will also tone down your colors if desired. After everything is dry, spray the metal sheets with a flat varnish to protect your color and lock everything into place.
Applying Paint
As we continue to work on our weathered tin sheeting, there are times when we will need to paint them; such as when it’s used as siding. This is rather easy once we’ve completed part one in this series.
Assuming we followed the steps in part one, we will then cover our sheets with AK-Interactive Chipping Effects. You can either use a brush or spray it on, for this application, I brushed on the worn effects fluid and let it dry.
Color


I wanted a very rough paint job for this article so I decided to sponge on the acrylic paint instead of using an airbrush. I use this technique to give whatever material I’m using a very uneven and rough surface.
Now the fun part. Once dry, soak a toothbrush in water and wet the entire surface of the metal sheets. Allow the water to set a moment and then gently brush the pieces. I’m using small circular motions with the brush. You should notice the paint starting to flake off. The more you brush, the more paint is removed. You can also use a toothpick to add scratched in the pieces as well.
Rust
Similar to the steps above, I will start with my darker rust colors first. I work the color with a sponge around the edges of the paint, even coloring over the paint in some areas. This will give the illusion that some of the rust is washing over the paint as well as behind it. The color we added underneath the top coat will begin to blend into the new color as well.

I will then follow up with lighter acrylic rust colors around some of the edges as well as the holes. Once everything is good and dry I will lightly add rust pigments to the holes and brush on white mineral spirits to allow them to flow into all of the crevices as in part one of the series.
Continue the process with each of your tin sheets until you are satisfied with the color. Again, you can dust on a layer of dirt to further weather and blend the colors which will add to the realism. Cover everything with a flat varnish and you are done.

A brilliant tutorial Shawn! Thank you for sharing.
Thank you very much! I’m glad it’s useful